Simplified Stats Wizard
  • Home
  • Beginner
  • Low Intermediate
  • High Intermediate
  • Advanced
  • Stats Central
  • Home
  • Beginner
  • Low Intermediate
  • High Intermediate
  • Advanced
  • Stats Central
Search by typing & pressing enter

YOUR CART

​Advanced

(Serve-Receive Error Percentage around 8-15%)

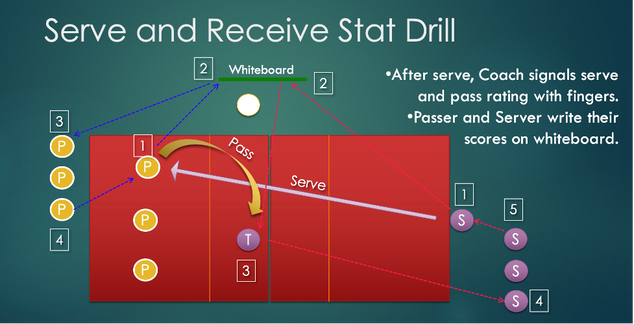
An advanced team is very good at receiving the ball. Statistical focus should be: 
​
  1. Serve Rating
  2. Receive Rating
  3. All Stats
  4. Attack – Attempts, Kills, Errors
  5. Dig – successful, errors
  6. Free ball pass ratings
  7. Block – successful, errors

Serve-receive strategy for Advanced teams

You should have at least three good passers at this level of play. If you have two excellent passers, you could try using just two passers.

Number of receivers: 3

Offensive system for Advanced teams

Use a 6-2 or 5-1 based on how many good setters you have. If one setter is excellent but short, that setter can still play in the front row. The loss of blocking is typically not significant when compared to setting accuracy.
​

6-2 system
5-1 system
 

Drills for Advanced teams

Serving Drills | Passing Drills | Setting Drills | Digging Drills | Hitting Drills | Team Drills
 

Focus on Serving First

​If you serve well, you can put pressure on your own team to serve-receive better.
 
Technique:
  • Low toss
  • High 5 – compact, powerful swing

Skill Drills - Serving


​Wall Serve Drill
 
Goal: Gain consistency in toss, contact, power.
 
How to do it:
  • Start about 10 feet away from the wall.
  • Serve to a spot on the wall about 8-9 feet high.
  • Get 10 good serves to the spot.
  • Back up one long step and repeat.
  • Get to where you are 30 feet from the wall, if possible.​
Picture

Serving Competition Drill
 
Goal: To serve consistently over the net under pressure.

How to do it:
  • Split team into two groups, try to distribute the serving skill evenly across both teams.
  • Two servers at a time, coach blows whistle.
  • If you make a good serve, you go to the other side.
  • If you miss, you go back to the end of your team’s line.
  • First team to get everyone to the other side wins.
Picture

​Rotation Game
 
Goal: Serve accurately to all 6 zones on the court. Learn to serve under pressure.

How to do it:
  • Split up into 2 teams.
  • Each team sets up on opposing end-lines.
  • Each team sends one player to the opposing court.
  • That player is a catcher who sits in Zone 1.
  • On the coach’s whistle, everyone serves to their player.
  • The player must catch a ball while sitting.
  • Once the player catches a ball, they run back to their team. The successful server takes the catcher’s place but in the next zone. (Zone 2)
  • The game continues until one team wins by completing a Zone 6 catch.
Picture

Zone Serving Drill
 
Goal: Use a 5x5 grid of 25 zones instead of the normal 6 zones. This requires more precise serving mentality and engages more effort. It uses the concept of “aim small, miss small."
 
Note: This grid system is extremely useful as a language to communicate spots on the court in a very precise way – not just for serving but for attacking and defending.
 
How to do it:
  • 5x5 grid
    • Each row is a strip from left to right with Row 10 the closest to the net (0 to 6 feet deep) and Row 50 the last 6 feet of the court (24 to 30 feet) along the end-line.
    • Each row is split into 6-foot wide zones – from left to right. 1 is the left side + 6 feet. 5 is the right sideline minus 6 feet. (See grid image)
Picture
Picture
  • Target specific zone.
    • Serve 5 balls to each of the zones that are called out.
      • 31, 33, 35, 42, 44, 51, 55
  • Ball must be below the top of the antenna and reach Zones 30-50.
  • Coach calls zones.
    • Once teams are comfortable serving a zone, coach calls various zones.
    • This makes it more game-like and unpredictable for the players.
    • Do a double-sided drill and have a challenge across the net.
    • First team to score X points wins.

​Sideline “Lane Serves” Drill
 
Goal: Be able to serve straight down the right and left sidelines. This is a difficult serve to pass, particularly when setters and MBs are transitioning in front of the served ball. 

How to do it:
  • Set up an extra antenna inside the court (6 feet on the left and right side).
  • Line up facing straight down each sideline. You might consider double-sided and have each side serve the right sideline, then the left sideline. This helps prevent servers from hitting each other with their serves.
  • Goal will be to make some number of good serves (like 10) down each “lane.” The lanes on the 5x5 grid are Lane 1 (left side) and Lane 5 (right side).
  • A good serve must go deep to row 40 or 50 and be below the top of the antenna. This is a fast, flat serve. 
Picture
 
Back to Top

2nd Focus: Passing

Serve Receive passing is the most important skill in volleyball because it determines if you can control the opponent’s serve well enough to attack and side out. Once your team is able to serve tough, it can learn to control tough servers. 
 
Technique:
  • Figure out where the ball is going early.
  • Move feet to the ball.
  • Set up platform.
  • Tilt to target.

Skill Drills - Passing​


Serve and Receive Stat Drill
 
Goal: Stat players’ serve and receive error or success % as well as their serve and pass rating (on a 1-4 scale). Get them in a “game mode” so there’s higher focus and intensity.
 
How to do it:
  • Servers on one side, passers on the other. Coach rates pass and serve. (See diagram.)​
  • Take quality ratings
    • Serve: 0-4
    • Pass: 0-3
Picture
Picture
 Team Receive Drill
 
Goal: Get your best passers on the court into 3- or 4-person receive as you would in a match.
​

How to do it:
  • Set up your rotations based on passing stats using the best receivers. (Use www.rotate123.com app to set up your formations and to communicate with your team.)
  • Have coaches and player serve hard at the receivers.
  • Set a goal of less than 25% receive error and at least 25% perfect passes. (Servers serve tough and are not scored.)
  • Use a white board to keep track of each rotation.
Picture

Butterfly Drill
 
Goal: Learn controlled serving and passing.
 
How to do it:
  • Set up a full Butterfly drill: Server, Passer, Target / Server, Passer, Target.
  • Set a goal of 5 or 10 perfect passes.
  • Set up server at appropriate location from mid-court all the way to off the court –depending on accuracy and power.
  • Drill should take no more than 10 minutes.
Picture

​ 180 Shuttle Drill

Goal: Learn inside-the-10-foot-line passing control. Many free-balls that land inside the 10-foot line get passed over the net because of lack of practice and not setting the platform angle correctly. This drill teaches fine balance and control. Also target over-the-head passing to a spot.

How to do it: See slides
Picture
Picture
Picture
Serve Receive Error Percentage Drill
 
Goal: Get team to understand the importance of rapid side out % – going for 50% or better. Target side out in 2 tries max.
 
How to do it:
  • 6 on 6 format.
  • Tough serving.
  • Receive and side out as quickly as possible.
  • Receive 12 serves. (Serve errors don’t count.)
  • Try to get through 6 rotations in 12 serves or fewer. 
  • This will be 50% side out or better.
Picture
 
Back to Top

3rd Focus: Setting

Using fingers to control the ball is an important skill and gets overlooked when players aren’t setters. Overhand ball control expands the players’ range of coverage. 
 
Technique:
  • Shape the ball with fingers and palms.
  • Look through the “window” created by thumbs and index fingers.
  • Ball should be above the forehead on contact.
  • Right foot forward, left foot back.
  • Face the target and follow through with palms facing target.

​
​Skill Drills - Setting


Wall Set Drill
 
Goal: Learn to use all fingers to set the ball consistently.
 
How to do it:
  • Mark a spot on a wall about 9 feet up.
  • Toss the ball to the wall and set it back to the wall.
  • Make sure to have hands high with arms almost straight out just a bit before locking elbows.  
  • Look at ball through “window” between thumb and index finger.
  • The ball should hit the player’s forehead if it were to slip through the fingers. Most times, hands are too low and ball will hit the chin.
  • Make 10 good sets to the spot. Make sure to shuffle feet with right foot slightly in front.​
Picture

2 Player Pepper with Sets
 
Goal: Get comfortable using hand sets.
 
How to do it:
  • 2 players pepper.
  • One player hits, the other player digs the ball to the hitter.
  • Hitter sets ball to other player and other player hits back.
  • Count how many hand sets the pair can achieve before the ball hits the floor. 
Picture
2 Setter + DS Triangle Set Drill
 
Goal: Improve setter footwork and accuracy.
 
How to do it:
  • One setter has ball and is the target. (Start in position 4.)
  • Toss to DS in the court.
  • DS attempts to make a perfect pass.
  • Second setter sets this ball to target.
  • Do 10. Count how many sets are perfect.
  • Swap setters.
  • As players improve, the “target” setter can also set (instead of toss) to the DS.
Picture

5x5 Set Drill

Goal: Learn to set 5x5 when out of system so that hitter still has an opportunity to attack, and make sure the set does not go over the net.
.
How to do it:
  • Left front transitions off the net; 5 other positions ready to set the ball.
  • Coach tosses to any of the 5 players.
  • Player should consider just bump setting high, 5 feet off the net, 5 feet in the court.
  • Attacker hits this ball.
  • Goal is to get 20 good hits.
  • This drill is one big group of players, not divided into half hitters/half setters. It’s out-of-system setting and hitting for EVERYONE!

Notes:
  • Do both left and right side.
  • Setters can set 3x3 but should not attempt a perfect set off a bad pass. This tends to end up with a tight set, which is not easy to hit.
Picture
 
Back to Top

4th Focus: Digging

When training digging, reward effort! You want players to be aggressive going after every ball, even when completely out of reach. Emphasize fun. Players should learn to slide on the floor and enjoy it, and the team should enthusiastically cheer on the effort.
 
Technique:
  • Feet wider than shoulders, parallel toes.
  • Face the ball.
  • Arms low and hands covering knees.
  • Be low enough to touch floor with finger.
  • Move platform to meet the ball.
  • Make angles to rebound the ball up high and toward the center of the court.

Skill Drills - Digging


​Basic Slide Drill
 
Goal: Teach players how to slide safely and make it fun.
 
How to do it:
  • Get an old pair of socks. (Long tube socks are particularly good.) Cut 3 holes in both. Put hand into sock and put thumb, index and middle finger and last 2 fingers into each of 3 holes.
  • Socks should cover the palm and forearms, possibly up to elbows to prevent floor burns from sliding. Socks will also make sliding very smooth. Socks should look like the image to the right.
  • Player should have knee pads on.
  • Start on knees.
  • Reach and fall forward and slide on forearms.
  • Reach with dominant hand and catch the fall with the other hand, then slide.
  • Get low, take a step, reach with dominant hand and catch the fall with other hand, then slide.
  • Get smooth so that it’s quiet and body parts are not bumping on the floor.
  • Slide smoothly and as far as you can.​
  • Knee slide on both forearms.
  • Knee slide on one hand.
  • Standing slide.
Picture
Picture

Run Slide Drill
 
Goal: Have fun sliding.
 
How to do it:
  • Once players are confident in their sliding, have them line up on the end-line, run 2 steps and slide as far as they can.
  • Get up and run to the 10-foot line and slide. See who goes the farthest.
  • Make it a contest or just do slides at each line on the court from one side to the other.

​
​
Shuffle Slide Drill
 
Goal: Learn to slide sideways. (This is also a good conditioning drill.)
 
How to do it:
  • Have players in rows of 3 on the 10-foot lines and end-lines – all facing the coach who is off the court.
  • Coach will shuffle left or right, then yell “slide” and players will slide to their side on their belly.
Picture

Explosive Digging Drill

Goal: Learn to dig balls that are outside of your feet when you’re off balance. This will expand your defensive range.
 
How to do it:
  • Coach stands at center of 10-foot line with a basket of balls.
  • Players line up at center of the end-line.
  • One player enters the court at center, 20 feet from the net.
  • Player gets low, touches floor with hand.
  • Coach hits ball to left or right of the player, out of reach.
  • Player dives/slides in that direction.
  • Next player enters.
  • After all players display good reaction and safe diving, coach hits balls closer and closer to being in reach.
  • Players continue to dig and dive.
Picture

Team Dig Drill

Goal: Learn to dig hard hits by positioning properly.
 
How to do it:
  • Set up full 6 players.
  • Coaches or a more-experienced player attack from a set.
  • Team does its best to take position properly and dig hard hits.
  • Set a goal – like 50% good digs.
 
Back to Top

5th Focus: Hitting

At this level of play, it’s important to have good technique and generate power on spikes. The defense is getting better, so unless the ball is hit hard, it will be difficult to score.
 
Technique:
  • Hand contact
    • Big hand
    • Thumb to the side, fingers wide and loose.
    • Solid contact with middle of palm.
    • Snap with wrist.
  • Arm swing
    • Elbow high, ear level behind head.
    • Twist at waist.
    • Lead with shoulder, then elbow, then forearm snap.
  • Approach
    • Right handers – 3 step: left, right, left
    • Small to big steps
    • Slow to fast steps
    • Swing arms back on Step 2 and drive them upwards

Skill Drills - Hitting


​Wall Hit with Bounce
 
Goal: To make strong, controlled contact of a ball that’s in the air.
 
How to do it:
  • Stand 15 feet from a wall.
  • Toss ball up high and hit it to the floor just in front of the wall so the ball bounces back up.
  • Make sure to pull elbow back and swing through the ball, full hand contact and snap.
  • Learn to hit in a controlled manner so you can hit the ball again.
  • Try to hit 4 in a row. Ball should be above the head. If not, stop and start over.


​Wall Hit Drill

 
Goal: Learn to swing high and hard to drive the ball above the net like a Down Ball hit.
 
How to do it: 
  • Start 10 feet from a wall, mark a spot about 9 feet up.
  • Toss the ball high (basketball rim height – 10 feet.)
  • Swing and hit the ball to the spot.
  • Try to have power and accuracy.
  • If it’s easy, move back 3 steps and repeat.
Picture

Down Ball Hit, Player Toss Drill
 
Goal: Hit an actual down ball over the net.
 
How to do it:
  • Form 2 lines at the end-line.
  • First player moves to the 15-foot line and has a ball.
  • All players should grab a ball.
  • Front player tosses ball vertically about 10 feet straight up.
  • First player in line approaches and hits a Down Ball standing on the floor, swinging high and over the net into the other court.
  • Tosser shags, hitter gets ball from ball cart and tosses the next ball.
  • Coach should walk around and help hitters and tossers, guide the flow.
  • Set a goal – for instance, 10 balls hit into the court. Everyone counts.
Picture

3-Step Footwork Drill
 
Goal: Learn proper footwork before learning to hit the ball.
 
How to do it:
  • For right-handers, 3-step approach: Left, Right, Left.
  • Small to Large steps, Slow to Fast.
  • PLACE VIDEO HERE
  • Use arms to drive forward speed upward.
  • Practice this at home until it’s completely muscle memory.
Picture

Toss and Hit Drill
 
Goal: Learn to use proper footwork and armswing to hit ball.
 
How to do it:
  • Do the “Down Ball Hit, Player Toss” drill
  • Next progression: player JUMPS and hits the down ball.

Note: Players’ ability to toss the ball is very important.
  • Use 2 hands and learn how to make accurate, consistent, controlled tosses. Practice tossing ball into a basketball hoop from about 5 feet away. This will free up the coach to provide feedback without being the primary tosser.

​Deep 2 Sets Drill
 
Goal: Learn to swing through ball. Learn to use hands to set simple, vertical sets under control.
 
How to do it: See image below.
Picture
Picture
Transition Hitting Drill
 
Goal: Learn to transition off the net, pass the ball and attack.
 
How to do it:
  • Set up 6 players on one side with extra player ready to fill.
  • Coach or player toss or down-ball hit from opposing side.
  • Libero/DS passes the ball. You can also have OH in the back row.
  • Pass, setter sets and set 3 hitters.
  • Hitters hit and shag ball. Next player fills in.
Picture

 
Defensive Transition Drill
 
Goal: Learn full 6 on 6 defense to attack transition.
 
How to do it:
  • Two teams, one on each side.
  • From coach toss in, one side attacks.
  • Defensive side goal is to dig and transition and attack.
  • Scoring
    • Many different possibilities depending on your emphasis.
    • Simple Scoring – 10 toss-ins to each side, first team to 10 wins.
    • Middle emphasis – 10 toss-ins to each side, middle kill worth 2 points, first team to 10 wins.
    • Tempo emphasis – 10 toss-ins to each side, each tempo set kill gets 2 points, first team to 10 wins.
Picture

​Zone Hits Drill
 
Goal: Hit only Zone 51, 55. From left hit 25, from right hit 21. Tip 11, 15. Roll to 33 from all 3 positions. Avoid hitting the obvious places – straight cross court and to Zone 6, where the defense is waiting.
.
How to do it:

  • From free-ball or down-ball pass.
  • Hit into each zone 3 times, subtract 1 from previous hit for hitting into 6 or easy cross court.
  • Put up blocking device or blocker to make it harder.
 
Back to Top

Final Focus: Team Play

​
Team Play Drills

Toss-ins Drill
 
Goal: To practice the rally from first, second and third touch. Get player accustomed to thinking and playing. Keep the scrimmage super active.
 
How to do it:
  • Two teams, 6 on a side.
  • Coach calls out first ball or second ball or third ball, which indicate the number of contacts. “First ball” = 3 contacts, “Second ball” = 2 contacts; “Third ball = Ball has to be sent over the net.
  • Coach tosses to various players and different locations to improve control from different spots on the court. 
  • Rally is played out.
  • Points can be set to any format.
Picture
 
Wipe Out Game
 
Goal: Execute certain offensive plays. For example:
  • 2 hits down the line from left side.
  • 3 quicks to the MB.
  • 2 tips to Zone 15 from the right side.
  • Etc.
 
How to do it:
  • 6 on 6
  • Coach tosses to side that scores the kill.
  • First team to “wipe out” the list of attacks wins.
  • Scoring a kill does not count as a point.
Picture
 
Big 3 Drill
 
Goal: Score the last 3 points in a row from 22-22.

How to do it:
  • 6 on 6, normal volleyball.
  • The score starts at 22-22. Whichever team wins the first point takes a 23-22 lead. If that team loses the next point, the score flips to 23-22 for the other team.
  • Three consecutive points wins the game.
  • Serving options: 1. Regular serving; 2.  Stay in one rotation; 3. Servers can only serve once. (This gives more players practice at serving under pressure.)
Picture
 
Scrambled Eggs Drill
 
Goal: Score the last 3 points in a row from 22-22.
 
How to do it:
  • 6 on 6, coach initiates.
  • Win a point, the coach throws the ball to your team. Lose the point, the coach throws to the other team.
  • Once a team scores 3 points in a row, it serves at 22-20. Regular scoring ensues to 25, win by 2 points.
  • You can rotate normally or stay in one rotation for both the initiated balls and the serving sequences.
Picture
 
Activation Drill

Goal: Focus on a specific skill – for instance, a middle kill – that will activate scoring for your team. Once a team is activated, it gets consecutive free balls to score points until the opponent stops them.
 
How to do it:
  •  6 on 6 with a specific skill highlighted. Play starts with a free ball tossed in by the coach. The team that wins the rally gets the free ball.
  • ​When a team executes the highlighted skill, it earns 2 points and is activated.
  • Once a team is activated, it gets every ball – a free ball from the non-activated team off a coach’s toss – and can score points.
  • The activated team gets a point for every kill and 2 points for kills that come from the highlighted skill.
  • If the non-activated team wins the point, the game returns to the beginning with both teams once again trying to get activated.
  • Play either continues to a certain score – maybe 15 – or a set amount of time: maybe 8 to 10 minutes.
  • 2 Way Scoring Variation: When the defense stops an activated team, it becomes activated. However, it can only score with the highlighted skill.  ​
Picture
Back to Top

Establishing Performance Benchmarks

​You have to know how good your stats need to be to achieve your goals. That means answering two questions: Are your stats good enough to be competitive locally and nationally? How well do you need to SERVE, RECEIVE and ATTACK to win?
 
Click here to get more information about how to set statistical benchmarks for your team.
Questions? ​Contact us here!
Picture
Plan faster | Train smarter | Play harder
in partnership with
Picture
 SoloStats stat apps are completely FREE for taking stats. Choose the app that is appropriate for your needs from practice to matches to beach.
Proudly powered by Weebly