Simplified Stats Wizard
  • Home
  • Beginner
  • Low Intermediate
  • High Intermediate
  • Advanced
  • Stats Central
  • Home
  • Beginner
  • Low Intermediate
  • High Intermediate
  • Advanced
  • Stats Central
Search by typing & pressing enter

YOUR CART

​Low Intermediate

(Serve-Receive Error Percentage around 30-50%)

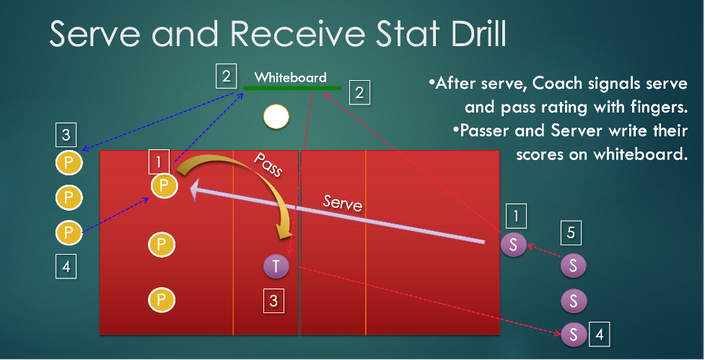
A Low Intermediate team with players who are more experienced than novice but still learning how to pass should focus on two stats: 
​
  1. Serve Rating
  2. Receive Rating

Other stats to consider are attack errors per set and digs and dig errors per set.

Serve-receive strategy for Low Intermediate teams

You need to decide if you have enough good passers to use a 3-person receive. Consider more if it helps. Your stats can guide you.
​
Number of receivers: 3 to 5

Offensive system for Low Intermediate teams

Typically, since the passing control is not reliable at this level of play, it’s best to use a front-row setter in a 4-2, but may choose to use a 6-3 depending on your team’s needs.
​

4-2 system
6-3 system
 

Drills for Low Intermediate teams

Serving Drills | Passing Drills | Setting Drills | Digging Drills | Hitting Drills | Team Drills
 

Focus on Serving First

If you serve well, you can put pressure on your own team to serve-receive better.
 
Technique:
  • Low toss
  • High 5 – compact, powerful swing

​Skill Drills - Serving

High 5 Contest
 
Goal: 
Discover that you already know the proper arm swing for serving​.
 
How to do it:
  • Split into 2 groups.
  • One group lines up on padded wall (usually near the basketball hoop).
  • On the count of 3, they all high 5 the wall in unison.
  • Try to be as loud as possible.
  • Group 2 goes to the wall and does the same thing and tries to be louder.
  • Contest goes on to find a winner - the loudest high 5 contact on the wall.​
Picture

​Net Serve Drill
 
Goal: 
Show players how high the ball should go and reinforce that it should be tossed vertically, not toward the server.
 
How to do it:
  • Stand at arm's length from net.
  • Toss the ball low, making sure it does not exceed the top of the net.​
  • The players don’t actually serve; they just toss, do their arm motion and let the ball bounce. ​
Picture

​Wall Serve Drill
 
Goal: Gain consistency in toss, contact, power.
 
How to do it:
  • Start about 10 feet away from the wall.
  • Serve to a spot on the wall about 8-9 feet high.
  • Get 10 good serves to the spot.
  • Back up one long step and repeat.
  • If possible, continue until you are 30 feet from the wall.​​
Picture

​Serving Over the Net Drill
 
Goal: Be able to serve over the net consistently.
 
How to do it:
  • This a one-way drill. Players serve, then shag their ball, which gives them some conditioning too.
  • Start at mid-court, use the tossing and contact techniques in wall drill.
  • Take your time.
  • Load serving arm.
  • Low toss.
  • High 5, strong contact.
  • Not enough power? Use flat fist with thumb to the side of fingers.
  • 10 serves. Keep track of how many go over.
  • 8 out of 10, move back to 20 feet from the net.
  • Repeat and continue to move back until behind the end-line.​
Picture

Serving Competition
 
Goal: To serve consistently over the net under pressure.

How to do it:
  • Split team into two groups, try to distribute the serving skill evenly across both teams.
  • Two servers at a time, coach blows whistle.
  • If you make a good serve, you go to the other side.
  • If you miss, you go back to the end of your team’s line.
  • First team to get everyone to the other side wins.
Picture

​Serving Rotation Game
 
Goal: Serve accurately to all 6 zones on the court. Learn to serve under pressure.

How to do it:
  • Split up into 2 teams.
  • Each team sets up on opposing end-lines.
  • Each team sends one player to the opposing court.
  • That player is a catcher who sits in Zone 1.
  • On the coach’s whistle, everyone serves to their player.
  • The player must catch a ball while sitting.
  • Once the player catches a ball, they run back to their team. The successful server takes the catcher’s place but in the next zone. (Zone 2)
  • The game continues until one team wins by completing a Zone 6 catch.
Picture
 
Back to top

2nd Focus: Passing

​Serve Receive passing is the most important skill in volleyball because it determines if you can control the opponent’s serve well enough to attack and side out. Once your team is able to serve tough, it can learn to control tough servers. 
 
Technique:
  • Figure out where the ball is going early.
  • Move feet to the ball.
  • Set up platform.
  • Tilt to target.

​Skill Drills - Passing
Straddle Drill
 
Goal: Determine a player’s depth perception quality.
 
Notes:
  • Players who can’t do this drill naturally and easily will have a difficult time being a primary serve-receiver.
  • Even experienced players can fail this drill.
  • Young players who do best at this drill are generally those who have spent time throwing, catching and dodging things from a young age. It’s a Darwin test for them. 

How to do it:
  • Coach stands on the other side of net from players.
  • Players line up along sideline.
  • One player enters the court 10 feet in from the sideline, 15 feet off the net.
  • Coach tosses ball.
  • Player shuffles and stops where the ball will bounce between her legs.
  • Players should have both feet on the floor.
  • Short balls and deep balls are the most difficult, so when you find a player who reads the ball quickly, make it harder.
  • Each player gets one turn, then shags the ball and returns it to the coach. (The distances are far enough that the line thins out, and there’s very little waiting. It can be done double-sided if there’s a second coach.)
Picture

​Pairs Toss Drill - Passing
 
Goal: Learn basic platform passing technique.
 
Note: This is a “player-initiated drill” vs. a “coach-initiated drill.” This format allows all players to be active (no waiting in line), and the coach can walk around and provide feedback, particularly to those who need more help.
 
How to do it:
  • One player stands at the 10-foot line facing the end-line with a ball.
  • The other player stands about 10 feet away from this player and faces the net.
  • Player with the ball tosses medium high ball – at least as high as the top of antenna – to the passer.
  • Passer shuffles in athletic stance, joins hands and passes on forearms back to the tosser.
  • Do 10 passes with good form and switch places.
  • If players are more skilled, they can toss the ball deep and short to force the passer to move more.​​
Picture

​Triples Pass Drill
 
Goal: Learn to face ball, then tilt platform to target.
 
How to do it:
  • 3 players, 2 at the 10-foot line facing the end-line.
  • Player on right has the ball.
  • 3rd player is the passer at the 20-foot line facing the player with the ball and lined up with this player.
  • Player with the ball tosses to the passer.
  • Passer shuffles to the ball, tilts platform by dropping right shoulder and passes to target player.
  • Target gives ball to tosser.
  • Repeat 10 times and rotate positions.
  • If skill level is good, tosses can be more challenging to get to. ​
Picture
​
​Perfect Pass Competition
 
Goals: Learn to compete by making perfect passes. Learn teamwork and how to win.
 
Note: Gaming the game is OK. This is part of teamwork and figuring out how to win. For example, easy tosses make it easy to make perfect passes. If the coach wants it tougher, ask players to serve the ball beginning at the 10-foot line and then make it harder by moving back until they are behind the end-line.
 
How to do it:
  • Tosser, Passer, Target.
  • Should be about a 6-foot x 5-foot box right of center, where the setter stands for a perfect pass.
  • 2 groups of at least 4 players.
  • Set up 2 half butterflies.
  • Mark a box using cones, dots, tape or lines on the floor.
  • Target stands in perfect pass box.
  • Tosser tosses to passer. Passer attempts to make a perfect pass – high enough, above antenna to target. Target must catch the ball while standing in perfect pass box.
  • Players rotated in following the ball – tosser to passer, passer to target, target to tosser.
  • Winner is first team to get 10 perfect passes.
Picture

Serve and Receive Stat Drill
 
Goal: Stat players’ serve and receive error or success % as well as their serve and pass rating (on a 1-4 scale). Get them in a “game mode” so there’s higher focus and intensity. 
 
How to do it:
  • Servers on one side, passers on the other. Coach rates pass and serve. (See diagram.)​
  • Take quality ratings
  • Serve: 0-4
  • Pass: 0-3
Picture
Picture
Team Receive Drill
 
Goal: Get your best passers on the court into 3- or 4-person receive as you would in a match.
​

How to do it:
  • Set up your rotations based on passing stats using the best receivers. (Use www.rotate123.com app to set up your formations and to communicate with your team.)
  • Have coaches and player serve at the receivers. Progress from easier serves to hard serves.
  • Set a goal of less than 25% receive error and at least 25% perfect passes. (Servers serve tough and are not scored.)
  • Use a white board to keep track of each rotation.
Picture

Butterfly Drill
 
Goal: Learn controlled serving and passing.
 
How to do it:
  • Set up a full Butterfly drill: Server, Passer, Target / Server, Passer, Target.
  • Set a goal of 5 or 10 perfect passes.
  • Set up server at appropriate location from mid-court all the way to off the court –depending on accuracy and power.
  • Drill should take no more than 10 minutes.
Picture
 
Back to top

3rd Focus: Setting

Using fingers to control the ball is an important skill and gets overlooked when players aren’t setters. Overhand ball control expands the players’ range of coverage. 
 
Technique:
  • Shape the ball with fingers and palms.
  • Look through the “window” created by thumbs and index fingers.
  • Ball should be above the forehead on contact.
  • Right foot forward, left foot back.
  • Face the target and follow through with palms facing target.
​

​Skill Drills - Setting


Wall Setting Drill
 
Goal: Learn to use all fingers to set the ball consistently.
 
How to do it:
  • Mark a spot on a wall about 9 feet up.
  • Toss the ball to the wall and set it back to the wall.
  • Make sure to have hands high with arms almost straight out just a bit before locking elbows.  
  • Look at ball through “window” between thumb and index finger.
  • The ball should hit the player’s forehead if it were to slip through the fingers. Most times, hands are too low and ball will hit the chin.
  • Make 10 good sets to the spot. Make sure to shuffle feet with right foot slightly in front.​
Picture

2 Player Pepper with Sets
 
Goal: Get comfortable using hand sets.
 
How to do it:
  • 2 players pepper.
  • One player hits, the other player digs the ball to the hitter.
  • Hitter sets ball to other player and other player hits back.
  • Count how many hand sets the pair can achieve before the ball hits the floor. 
Picture

​2 Setter + DS Triangle Set Drill

 
Goal: Improve setter footwork and accuracy.
 
How to do it:
  • One setter has ball and is the target. (Start in position 4.)
  • Toss to DS in the court.
  • DS attempts to make a perfect pass.
  • Second setter sets this ball to target.
  • Do 10. Count how many sets are perfect.
  • Swap setters.
  • As players improve, the “target” setter can also set (instead of toss) to the DS.
Picture

5x5 Setting Drill

Goal: Learn to set 5x5 when out of system so that hitter still has an opportunity to attack, and make sure the set does not go over the net.
.
How to do it:
  • Left front transitions off the net; 5 other positions ready to set the ball.
  • Coach tosses to any of the 5 players.
  • Player should consider just bump setting high, 5 feet off the net, 5 feet in the court.
  • Attacker hits this ball.
  • Goal is to get 20 good hits.
  • This drill is one big group of players, not divided into half hitters/half setters. It’s out-of-system setting and hitting for EVERYONE!

Notes:
  • Do both left and right side.
  • Setters can set 3x3 but should not attempt a perfect set off a bad pass. This tends to end up with a tight set, which is not easy to hit.
Picture
 
Back to top

4th Focus: Digging

When training digging, reward effort! You want players to be aggressive going after every ball, even when completely out of reach. Emphasize fun. Players should learn to slide on the floor and enjoy it, and the team should enthusiastically cheer on the effort.
 
Technique:
  • Feet wider than shoulders, parallel toes.
  • Face the ball.
  • Arms low and hands covering knees.
  • Be low enough to touch floor with finger.
  • Move platform to meet the ball.
  • Make angles to rebound the ball up high and toward the center of the court.
​

Skill Drills - Digging

Basic Slide Drill
 
Goal: Teach players how to slide safely and make it fun.
 
How to do it:
  • Get an old pair of socks. (Long tube socks are particularly good.) Cut 3 holes in both. Put hand into sock and put thumb, index and middle finger and last 2 fingers into each of 3 holes. See image to right.
  • Socks should cover the palm and forearms, possibly up to elbows to prevent floor burns from sliding.
  • Socks will also make sliding very smooth.
  • Player should have knee pads on.
  • Start on knees.
  • Reach and fall forward and slide on forearms.
  • Reach with dominant hand and catch the fall with the other hand, then slide.
  • Get low, take a step, reach with dominant hand and catch the fall with other hand, then slide.
  • Get smooth so that it’s quiet and body parts are not bumping on the floor.
  • Slide smoothly and as far as you can.​
  • Knee slide on both forearms.
  • Knee slide on one hand.
  • Standing slide.
Picture
Picture

Run Slide Drill
 
Goal: Have fun sliding.
 
How to do it:
  • Once players are confident in their sliding, have them line up on the end-line, run 2 steps and slide as far as they can.
  • Get up and run to the 10-foot line and slide. See who goes the farthest.
  • Make it a contest or just do slides at each line on the court from one side to the other.

​
​
Shuffle Slide Drill
 
Goal: Learn to slide sideways. (This is also a good conditioning drill.)
 
How to do it:
  • Have players in rows of 3 on the 10-foot lines and end-lines – all facing the coach who is off the court.
  • Coach will shuffle left or right, then yell “slide” and players will slide to their side on their belly.
Picture

Standing Dig Drill
 
Goal: Learn the proper stance and platform for digging a spike.
 
How to do it:
  • Form a single line at end-line.
  • Balls in a basket next to coach at 10-foot line.
  • Coach hits balls at the players.
  • Player must move into the court, make a wide stance and touch the floor before coach hits.
  • Coach hits into platform.
  • Player digs and shags ball, puts it in the basket, returns to the line.
  • Looking to get 10 good digs.
Picture

Run Through Drill

Goal: Learn to chase a ball and direct it back to the court.
 
How to do it:
  • Form a single line in either corner.
  • Coach stands at 10-foot line with basket.
  • Coach tosses ball out in front of player, player runs and bumps ball to setter location.
  • Player shags ball.
  • Coach tosses to next player. Coach can toss the ball out in front of player to make it more or less challenging depending on the skill of each player.​
Picture

180 Chase Drill

Goal: Learn to pass a ball that is going over your head. Learn to pass it back over your head into the court.
 
How to do it:
  • Form a line on the sideline.
  • One player enters the center of the court.
  • Coach stands at 10-foot line at the center of the court with a basket of balls.
  • Player gets down and ready to dig.
  • Coach throws ball over player’s head.
  • Player must pivot, chase the ball and pass the ball back to the court.
  • After pass, players shag their own ball to the basket.  
  • Note: Players must learn to pivot in the right direction so they don’t lose sight of the ball. If the ball goes over the right shoulder, players should pivot to the right and keep eyes on the ball as they turn and run. 
Picture

Explosive Digging Drill

Goal: Learn to dig balls that are outside of your feet when you’re off balance. This will expand your defensive range.
 
How to do it:
  • Coach stands at center of 10-foot line with a basket of balls.
  • Players line up at center of the end-line.
  • One player enters the court at center, 20 feet from the net.
  • Player gets low, touches floor with hand.
  • Coach hits ball to left or right of the player, out of reach.
  • Player dives/slides in that direction.
  • Next player enters.
  • After all players display good reaction and safe diving, coach hits balls closer and closer to being in reach.
  • Players continue to dig and dive.
Picture
 
Back to top

5th Focus: Hitting

At this level of play, it’s not very important to jump and spike the ball. It’s more important to learn good hand contact, arm extension and power generation. Hit down balls (feet on the floor) and practice shuffling to position – ball in front of hitting shoulder. Don't be under the ball.
 
Technique:
  • Hand contact
    • Big hand
    • Thumb to the side, fingers wide and loose.
    • Solid contact with middle of palm.
    • Snap with wrist.
  • Arm swing
    • Elbow high, ear level behind head.
    • Twist at waist.
    • Lead with shoulder, then elbow, then forearm snap.
  • Approach
    • Right handers – 3 step: left, right, left
    • Small to big steps
    • Slow to fast steps
    • Swing arms back on Step 2 and drive them upwards

Skill Drills - Hitting


​Wrist Snap Bounce Drill
 
Goal: Learn how much power can be generated through quick wrist snap.
 
How to do it:
  • Players hold a ball in their non-hitting hand at waist level in front of their hitting hand.
  • Using just the open hand and wrist, snap the ball to the floor.
  • See how high a bounce you get.
  • Do it 10 times, attempting to get a better snap and full hand contact on the ball for a higher bounce.


​Arm and Wrist Snap Bounce Drill


Goal: Same as above but with more power, bounce the ball as high as possible.
 
How to do it:
  • Same as "Wrist Snap Bounce," only start with hand up and elbow high.
  • Make a wood chopping motion through the ball, snapping at the elbow and wrist.
  • Bounce the ball as high as possible.
  • Have a team contest to see who can bounce it highest.
Picture

​Wall Hit with Bounce Drill
 
Goal: To make strong, controlled contact of a ball that’s in the air.
 
How to do it:
  • Stand 15 feet from a wall.
  • Toss ball up high and hit it to the floor just in front of the wall so the ball bounces back up.
  • Make sure to pull elbow back and swing through the ball, full hand contact and snap.
  • Learn to hit in a controlled manner so you can hit the ball again.
  • Try to hit 4 in a row. Ball should be above the head. If not, stop and start over.


​Wall Hit Drill

 
Goal: Learn to swing high and hard to drive the ball above the net like a Down Ball hit.
 
How to do it: 
  • Start 10 feet from a wall, mark a spot about 9 feet up.
  • Toss the ball high (basketball rim height – 10 feet.)
  • Swing and hit the ball to the spot.
  • Try to have power and accuracy.
  • If it’s easy, move back 3 steps and repeat.
Picture

Down Ball Hit, Player Toss Drill
 
Goal: Hit an actual down ball over the net.
 
How to do it:
  • Form 2 lines at the end-line.
  • First player moves to the 15-foot line and has a ball.
  • All players should grab a ball.
  • Front player tosses ball vertically about 10 feet straight up.
  • First player in line approaches and hits a Down Ball standing on the floor, swinging high and over the net into the other court.
  • Tosser shags, hitter gets ball from ball cart and tosses the next ball.
  • Coach should walk around and help hitters and tossers, guide the flow.
  • Set a goal – for instance, 10 balls hit into the court. Everyone counts.
Picture

Footwork Drill
 
Goal: Learn proper footwork before learning to hit the ball.
 
How to do it:
  • For right-handers, 3-step approach: Left, Right, Left. (The demonstration you’ll see in the video is a 3-step approach, but it can be 4. It’s situational depending on where the player is standing.)
  • Small to Large steps, Slow to Fast.
  • Use arms to drive forward speed upward.
  • Practice this at home until it’s completely muscle memory.
Picture

Toss and Hit Drill
 
Goal: Learn to use proper footwork and armswing to hit ball.
 
How to do it:
  • Do the “Down Ball Hit, Player Toss” drill
  • Next progression: player JUMPS and hits the down ball.

Note: Players’ ability to toss the ball is very important.
  • Use 2 hands and learn how to make accurate, consistent, controlled tosses. Practice tossing ball into a basketball hoop from about 5 feet away. This will free up the coach to provide feedback without being the primary tosser.

​Deep 2 Sets Drill
 
Goal: Learn to swing through ball. Learn to use hands to set simple, vertical sets under control.
 
How to do it: See image below.
Picture
Picture
 
Back to top

Final Focus: Team Play

​Team Play Drills


​Toss-ins Drill
 
Goal: To practice the rally from first, second and third touch. Get player accustomed to thinking and playing. Keep the scrimmage super active.
 
How to do it:
  • Two teams, 6 on a side.
  • Coach calls out first ball or second ball or third ball, which indicate the number of contacts. “First ball” = 3 contacts, “Second ball” = 2 contacts; “Third ball = Ball has to be sent over the net.
  • Coach tosses to various players and different locations to improve control from different spots on the court. 
  • Rally is played out.
  • Points can be set to any format.
Picture
Back to top

Establishing Performance Benchmarks

​You have to know how good your stats need to be to achieve your goals. That means answering two questions: Are your stats good enough to be competitive locally and nationally? How well do you need to SERVE, RECEIVE and ATTACK to win?
 
Click here to get more information about how to set statistical benchmarks for your team.
Questions? ​Contact us here!
Picture
Plan faster | Train smarter | Play harder
in partnership with
Picture
 SoloStats stat apps are completely FREE for taking stats. Choose the app that is appropriate for your needs from practice to matches to beach.
Proudly powered by Weebly